
If you want to make a KYTRON yourself
Main Design Decisions
All these requirements are closely interrelated. None can be fixed without influence on the others.
- Mechanical moving principle:
Track design
Wheel design (2, 4, 6, 8, ... wheels?)
Walking design (1, 2, 3, 4, 6, ... legs?)
- Overall size
- Energy supply
Pure solar energy, or solar with batteries
Petrol fueled
Are there other possibilities?
- Kind of motorization
DC motors
Stepping motors
Diesel engines
- Self control and/or remote control
(Some degree of self control is needed anyway so you may call it a "robot"
Micro-controller/computer and software
Discrete logic circuits
Analog circuits
Pneumatics
How to get the parts
One problem when you try to get started in mobile construction is to get the right mechanical parts. This is especially true if you want to make a track design like my KYTRONs have. One source of tracks and the appropriate wheels may be toy trank tracks. But most of these do not work reliably enough. Chances are much better when the toy already has two motors and some kind of remote control, in this case the track mechanics can be asummed to survive at least on easy ground. Only the best might be good enough for harsh terrain.
One possibility is alway if you cannot buy something, make it yourself. This is often easier than one would have expected. You only have to think carefully, to find a feasable way.
Then you can have a look for those construction sets, as sold by some mail order houses. Sometimes you can find kits there which might be a good starting point for your own work.
One concrete hint is to look for the big (yes BIG! five times larger than KYTRON 3!) RC tank kits from TAMIYA (also: http://www.tamiya.com/), which are really good, but really expensive too.
Also hard to get, at least here in Austria.
On the other hand there is a very cheap kit of Winkler Schulversand (http://www.winklerschulbedarf.com/Winkler_Schulbedarf_Austria.htm on the page about 7th school level) with part no. 5234, which I recently ordered. I have to stress that I have no connection to that company and provide the following information just for your convenience.
I show you here some images of the construction phase:
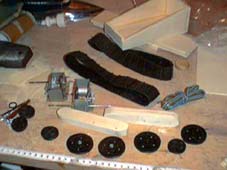
1. The construction kit
 © rm 1999
These are the main parts: The tracks (rubber), the wheels (plastic), the motors and gears. The wooden chassis is already cut and glued. (You will need some simple tools for wood crafting like pupils use in school.)
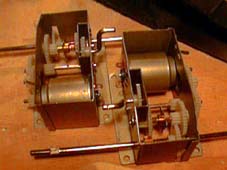
2. The motors and gears
 © rm 1999
Here are the DC motors and gears. They are very simple, good for experiments and demonstration. For real use you will have to look for a sturdier alternative.
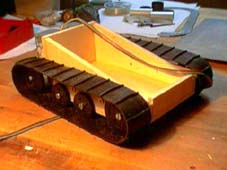
3. The front and rear look
 © rm 1999
 © rm 1999
I did not finish the kit, I just wanted the chassis with working motors and tracks.
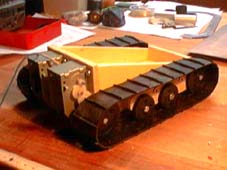
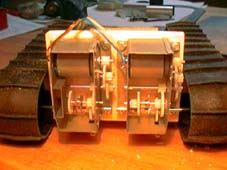
4. The motors and gears built in
 © rm 1999
This close-up shows the still open gear boxes.
Construction time so far: three hours!
And it works already, of course with manual control (you press the wires onto the battery...).
5. What you can do with the kit
The elegant simplicity of the kit invites you to start you own experiments.
At first you might want to finish some simple remote control (the kit has the parts for this included). Then you will test the driving behavior of those tracks. Which maximal load can be put into the box? How high may an obstacle be so the robot may climb it?
By such simple experiments you may find out, what the obstacle avoidance algorithm should be able to do, and what sensors it will need. Also you will develop ideas, how to improve the mechanics, and there is a lot to improve ;-). Besides better motor/gear units, it is important to add some suspension to the wheel construction. Again, the design of the kit allows for easy experimentation with different approaches to suspension. Try it out and see what works best for you.
In order to optimize the whole thing, you could easily end up having replaced nearly everything:
- Better wheels, drawn from light stable plastics.
- Better bearings, even ball bearings.
- Precision motors and gears.
- And a lighter material for the chassis.
Still the kit has had its worth to get you started!
When the mechanics are OK, the funny part starts:
Construction of the brain of the machine, adding sensors and actors, and designing the housing.
Good luck.